Leveling the 3D printer bed is one of the keys to completing an ideal model because it affects the success of the print. First-layer adhesion, elephant footing, and warping on the prints, are common problems that can result from poor leveling. Even experienced 3D printing enthusiasts can be bothered by them when using a new printer or replacing a new filament. Next, two commonly used leveling methods will be introduced, automatic leveling and manual leveling.
How to level the printer bed? Leveling tutorial for FDM 3D printing
Before explaining the two leveling methods in detail, let’s briefly talk about their meaning of it. Leveling the printer bed is somewhat similar to building a house, we need to make sure that the first layer is level. This is so that molten material doesn’t tilt in each subsequent layer.
- Leveling the print plane. It is important that the distance between each point on the printer bed and the nozzle is the same.
- Adjust the distance between the nozzle and the surface of the printer bed to a suitable one, usually about 0.2mm.
Three are 3 key points here: the plane of the printer bed, the plane formed by the nozzle movement, and the distance between the two planes. We need the two planes to be horizontal and at right distance from each other, this way, we will be able to print a good base layer and ensure that the filament extruded from the nozzle has the right thickness.
Auto leveling vs manual leveling
Leveling the printer bed is a problem that has always troubled 3D printer users. With the advancement of technology, 3D printers are becoming more and more intelligent, and automatic leveling with a single button is already possible. There is also a problem that in the past, choosing a machine with auto leveling meant a higher price, so many people preferred to do it themselves.
Luckily we can find out about Anycubic Kobra Go, the best all-around FDM printer for beginners. The Early Bird price on the official website is even lower than $200. Anycubic Kobra series is one of the most recognized FDM 3D printers in the market, has extremely high printing performance, is equipped with a self-developed auto-leveling system, which compensates for firmware algorithms through 25-point accuracy detection, precise leveling can be easily achieved with a single button.
How to level the printer bed on 3D printers with auto-leveling
I’m going to show you how to level the printer bed on a Kobra Go. But it is the same principle no matter which printer you have. Select auto-leveling and set the appropriate Z-axis compensation value. After setting all this up, the 3D printer works perfectly with every single print.

Step 1: Turn on the machine and go to the main menu. Click on Leveling and move the button to Auto-leveling. The print head and printer bed will be heated and then the nozzle will automatically detect the dots on the platform.
Note: Before leveling, please ensure that the printer bed and nozzle are clean. And do not touch the printer bed and nozzle to prevent high temperatures.
Step 2: After probing the platform, put a piece of paper onto the printer bed, click Z offset + or - to adjust the Z-axis height until the nozzle touches the paper. Feel a slight resistance when you pull the paper, then click OK.
Step 3: Do a bed level test print. Make sure the filament extrusion is no problem, then you can start the test print. If the distance between the nozzle and printer bed is too wide, the bottom layer will not stick to the print platform, it is difficult to print the next layers well. If the distance is too close, the nozzle will prevent material extrusion and scratch the platform.
How to level the printer bed with manual leveling
Manual leveling requires more careful adjustment and patience, but that doesn’t mean it’s hard to do. Follow these steps to level the printer bed, you will be more capable of 3D printing.
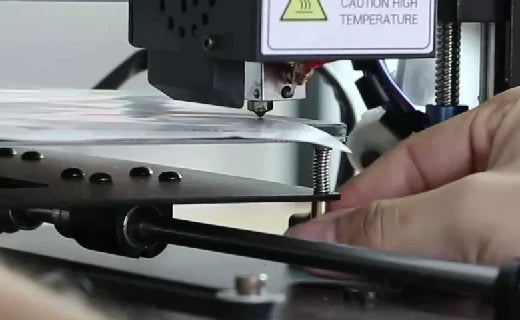
Three points to form a plane, but most 3D printers will adjust the four corners of the printer bed to achieve leveling. Knowing this, we can lower the Z-axis and be ready to adjust the screws or knobs in the four corners of the print bed, depending on the printer you are using.
Step 1: First, move the frame to just above the first adjustment, take a piece of paper, slide it under the nozzle, and adjust the bed until there is a slight resistance on the paper.
Step 2: Then you find the button which can move the nozzle to back corner, do it again adjust the adjustment screw, until the piece of paper barely slides out, as you feel significant resistance. Do this at each corner, when you get four corners you can adjust the print head to the center of the printer bed, and do the same thing.
Step 3: Once we have determined that the plane formed by the print head is at the right distance from the printer bed, we can adjust the Z-axis compensation value to perform the print well. You can find the setting of printer, set 0.2mm and adjust it, print a test file until a good first layer of adhesion can be seen on the printer bed.
Common problems with leveling printer bed
- When should I level my 3D printer bed?
After the install of 3D printer and before printing of model. Re-leveling can also be done when your printer has not been adjusted for a while, or when you are unable to print a good first layer.
- Level 3D printer bed or cold?
The automatic leveling system heats the nozzle automatically, it can provide more accurate leveling. But manual leveling generally choose the cold leveling.
- Why is the first layer I print too thin?
Adjust z-axis height. Or use a wrench to turn the screw that adjusts the print head, you should make it to reduce the extrusion force of the extruder.
- Why I still can’t print successfully?
Check your frame, screws and belt if you get inconsistent first layers. The screws of the Z-stepper may be loosen over time.
In summary, there is no need to worry about the leveling of printer bed, we have the quickest and easiest tutorial to learn how to level the printer bed before 3D printing. When we figure out how it works, leveling the printer bed will become a problem that can be handled simply, we will have better experience with 3D printing.


