Layer height is a concept often involved in 3D printing. With the in-depth use of FDM printers, there is a need to change the layer height to suit the printing of different models. The right layer height settings can help us optimize printing quality, improve printing efficiency, and achieve a smoother 3D print surface. So what is a good layer height for 3D printing? In this article, we will briefly explore ways to optimize the layer height settings, and provide useful suggestions to meet the different situations.

What is Layer Height of 3D Printing?
3D printing layer height refers to the thickness of each layer of material during deposition, which is the distance between the top of the printed material and the previous layer. Layer height mainly affects the quality and efficiency of 3D printing. The lower the layer height, the better the printing quality and better surface finish. The setting of the layer height depends on the specific requirements of the 3D prints. To achieve the best effect, it can be set according to different requirements for details, efficiency or material consumption.
The layer height can be set by slicing software, but it will be affected by the accuracy of 3D printer nozzle. The nozzle size determines the maximum layer height that can be used. Normally, the printer nozzle size is 0.4mm, and the layer height setting range is 0.05mm to 0.4mm. The printer’s Z-axis accuracy and printing speed of the printer will also have a certain impact on the layer height, so when selecting the layer height, it is necessary to consider the trade-off between print quality and efficiency, as well as the performance and limitations of the machine.

Implications of Optimizing 3D Printing Layer Height
The three aspects mentioned below are the main effects of layer height on 3D printing. We try to adjust the layer height to meet different needs, realize various print effects, and make printing more professional and personalized. A good layer height can help us achieve a smoother model surface, print out details with precision, or help us improve efficiency, save time and filament. Settings the right layer height is an important step in advanced printing techniques.
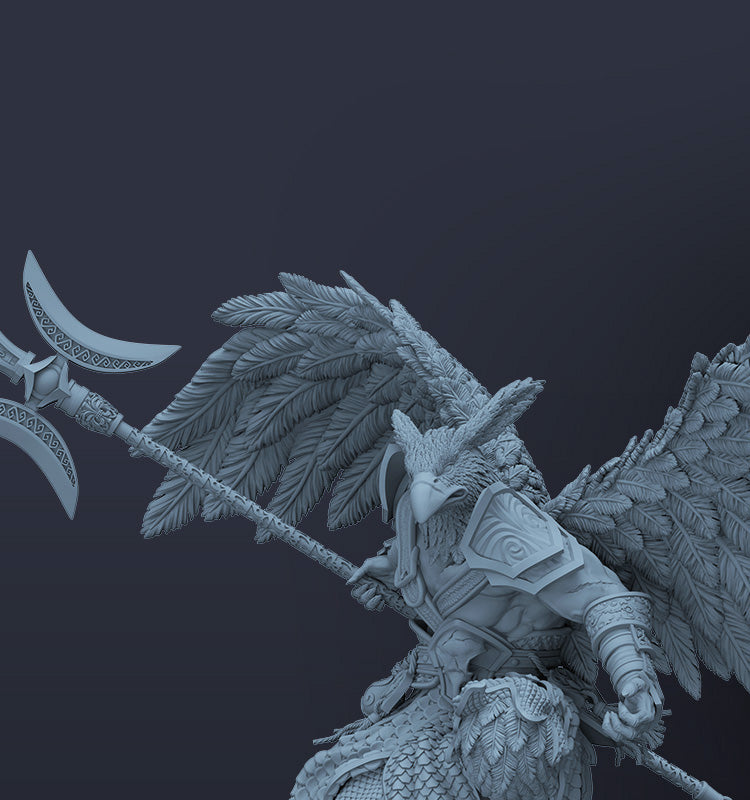
Print accuracy: A smaller layer height will have an advantage in restoring print details. It means that each layer of material is thinner, so it can print model features more accurately. A larger layer height is suitable for a model with a larger overall size, or a print with less detail.
Surface finish or layer line: Smaller layer heights can print smoother print surfaces, while larger layer heights are suitable for achieving textured surfaces, but may also show more pronounced layer line.
Print efficiency: Layer height has an impact on both print time and material consumption. Setting a smaller layer height will use more material at a lower speed. The larger layer height supports the machine to print the model at a faster speed, with less filament for the same situation.

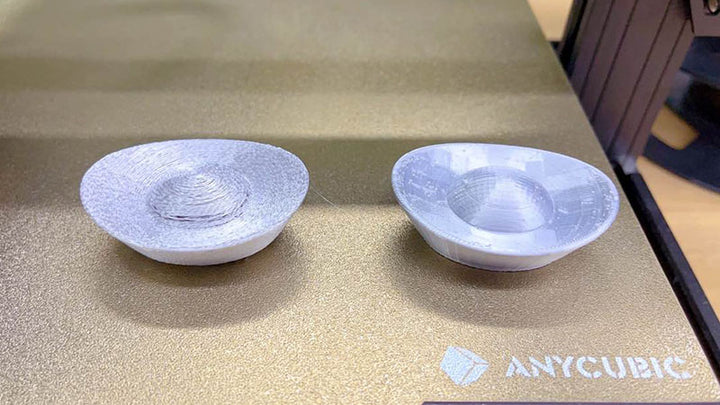
Model printed by Anycubic Kobra Plus
Recommendations for Layer Height Settings
For different applications of 3D printing, you can set different layer heights to achieve better results in terms of detail, intensity, and speed. Usually, the 3D printer you use will have a default layer height for common needs. When you need to adjust the layer height, you can do it in the slicing software. Below are some examples and recommended layer heights.
High resolution printing: for miniature models, detailed prints, vases and other decorations with a smooth surface, it is recommended to use a layer height of 0.1mm for printing, which can achieve the accuracy and finish of the printed printed parts. If the model is small and complex, it can also be adjusted to a layer height of 0.05mm to improve printing accuracy.
Large prints and prototype prints: smaller layer height is more suitable for them. Large volume home furnishings, layer size statues, and when used to test prototypes, can be printed with 0.2mm-0.3mm. A large layer height can shorten the printing time, and can also achieve some special textured surfaces of prints.
Choosing a more stable FDM printer, such as Anycubic Kobra Plus, will make it easier to adjust and set the 3D printing layer height. This is because in addition to the nozzle, the z-axis accuracy and printing speed of the printer will also affect the layer height. If the z-axis accuracy is not properly calibrated, or if the machine is not stable enough to support higher print speeds, then it will not be possible to achieve the best combination of print and layer height, and it will be difficult to achieve better print quality and efficiency. The advantage of Anycubic Kobra Plus is the double-threaded Z-axis, which enables the machine to run smoothly and is easy to calibrate. It has a one-key leveling function, which can flexibly adjust the machine settings to meet the printing needs of different models. For the printing of small models, it can achieve low layer height and high precision; for the printing of large models, the printing size of Anycubic Kobra Plus is 300*300*350mm, and the printing speed is 100-180mm/s, which can be adjusted to high layer height and high printing speed, complete 3D prints building quickly.