
After continuous testing, we provided users with the fine-tuned profiles on Anycubic FDM 3D Printer, which can be imported into Cura before slicing 3D models. The well-setting profiles are the officially suggested printing parameters specific to different kinds of filaments such as ABS, PETG, PLA and TPU for each Anycubic FDM printer. Certainly, after importing, users can adjust the parameters in slicer based on the specific situation or personal preferences. And this article will guide you on how to import Anycubic FDM 3D Printer profiles to Cura and where to get them.
1. Cura Installation

Method 1:
- Double-click the file “Ultimaker_Cura-4.12.0-win64” on the original SD card to install the software.
- File path: Memory card → “Files_ English_Anycubic Kobra Neo”→“Cura”→ “Windows”.
Method 2:
- Download the software directly from the Ultimaker official website.
Notice: Anycubic Kobra Neo 3d printer & Ultimaker Cura 4.12.0 software are used for example here, please refer to the memory card for the actual version.
2. Machine Settings
Upon completion of installation, the first launch of the software will display the following welcome screen. Click “Get started” to start the machine settings and follow the steps as shown below.
Step 1:

Step 2:
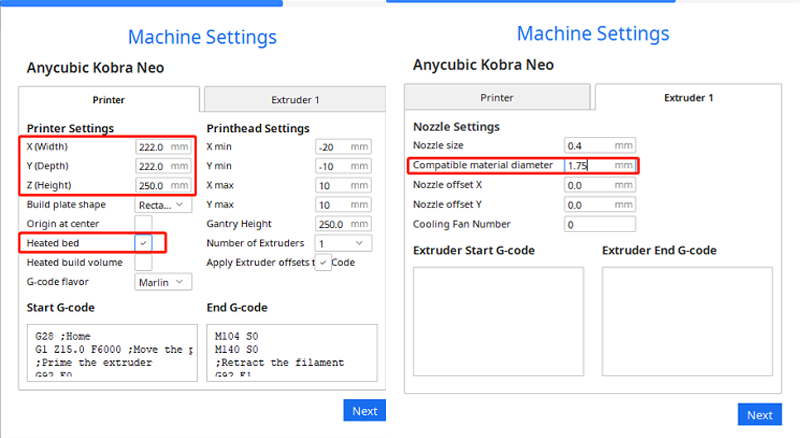
Notice: Anycubic Kobra Neo is just used for example here, please fill in according to the actual parameters of your printer.
3. Import the Configuration File
With all preparations completed, we enter the critical step. Import the Suggested Parameters Profiles we provided for Anycubic FDM printers. It should be noted that different 3d printers from Anycubic have their own files, please apply the correct files on the corresponding machine.
Where to get the files?
How to import the files?

Step 1:
Click Settings → Configure setting visibility..., and then tick the "Check all" box to make all settings visible.Step 2:
In the same interface opened in Step 1, click the “Profiles” tab on the left side. Then click the "Import" button to import the desired print profile. Only one file can be imported at a time. If importing multiple files, repeat the same operation in step 2.
Notice:
Step 3:
Select the profile that you just imported, and then click the “Activate” button. Here we have successfully imported the file to Cura slicer, and we hope you enjoy printing!
Notice: