
Mastering 3D printing is a steep learning curve that involves a process of trial and error and continuously obtaining knowledge. Many common issues in FDM printing, such as warping, stringing, slanting and the rough first layer, can frustrate you. This article will focus on one of the most common problems that often trouble many 3D printing hobbyists: Z banding and Z wobble, and provide solutions to fix them.
What is Z-Banding in 3D Printing?
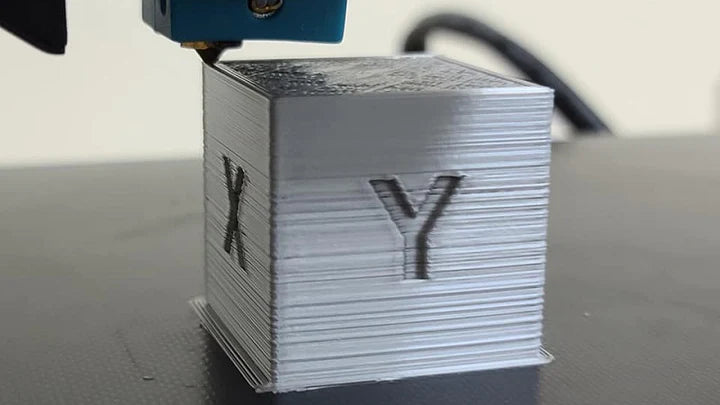
Z banding, also known as ribbing, is formed by visible and repetitive layer lines on the outer surface of your 3D prints that result in rough texture and inaccurate details. And Z banding has much to do with Z-axis. The Z-axis controls the movement of the printhead, which extrudes molten material downward from the nozzle when the printhead moves upward. However, during the printing process, certain factors may cause some layers to become compressed and deposited in surface ridges. This issue is more likely to occur in 3D printers that have a single motor and thread rod in the Z-axis.
Fortunately, Z banding can be fixed by adjusting or replacing specific parts of the 3D printer. To effectively troubleshoot and fix Z banding, it is crucial to figure out the cause of Z banding.
What Causes Z-Banding in 3D Printing?

When it comes to the cause of Z banding, Z wobble and inconsistent extrusion are the two main reasons. It's easy to confuse Z banding and Z wobble, but they are not the same. In fact, Z wobble refers to a misaligned or tilted Z-axis that results in uneven movement during FDM printing, often caused by loose or aging hardware like lead screws and thread rods.
The other cause of Z banding is inconsistent extrusion like over-extrusion or under-extrusion, which means the flow rate is too high or too low. To be specific, over-extrusion is often attributed to a high-temperature setting, while under-extrusion can result from a clogged nozzle. The premise to avoid extrusion problems is using quality filaments.
The following 6 points are listed for detailed reasons of Z banding in 3D printing:
How to Fix Z-Banding in 3D Printing?
As mentioned above, Z-axis and extrusion system issues can cause Z banding, and we next mainly focus on checking for mechanical issues. So it's important to perform regular maintenance on your 3D printer. For example, lubricate the moving parts of the Z-axis and replace the aging parts on your 3D printer in a timely manner, which can effectively help to prevent Z banding. And if you are experiencing Z-banding, the 6 methods below can be helpful in troubleshooting and getting rid of Z-lines.
1. Secure Z-Axis Stepper Motor

A Z-axis stepper motor provides accurate vertical movement in small increments, in this case, a loose or bent motor will lead to Z wobble. Place your hand on your Z-axis stepper motor to check if it is jolting, and make sure that all the screws around the motor are tightened including the motor bracket. But not all FDM 3D printers come with Z-axis motor brackets, it requires users to print a motor bracket or carriage on 3D model sites for STL files like Thingiverse and mount it on the Z-axis with extra screws. What's more, a slightly bent stepper motor shaft on Z-axis easily gets overlooked, but it negatively affects the movement of the Z-axis and causes Z wobble as well. It is recommended to use a square to check for a bent shaft, and replace the motor if needed.
2. Replace the Bent Lead Screw

A lead screw consists of a threaded rod and a nut, which converts rotational motion into linear motion. In other words, when the rod is rotated, the nut moves linearly to produce precise motion. However, if the lead screw becomes crooked or rough, it can cause Z wobble and Z banding. To solve this problem, the lead screw should be detached from the Z-axis by an Allen key and rolled on a flat platform to see if there is a clear gap between the rod and the surface. An obvious gap indicates a bent lead screw that requires replacement and lubrication for smooth movement.
3. Tighten the Rod Coupler

A rod coupler, also called a shaft coupler, is a mechanical component that connects the threaded rod and the motor shaft. To firmly joint the two moving parts together, the rod coupler typically features two screws. And Z-axis misalignment often occurs when assembling a printer or replacing Z-axis parts. If the coupler is loose or misaligned, it is another cause of Z wobble. And the remedy for this issue is to make sure that the coupler is well-aligned with both the rod and the motor before tightening the screws.
4. Keep the Nozzle Clean

We have inspected the Z axis moving parts and identified them as the cause of Z wobble. The next step is to handle the problem of inconsistent extrusion, but the first step always is to clean the nozzle. A nozzle is a critical component on FDM 3D printers, designed to melt and extrude the material onto the build area. Unfortunately, when done inappropriately, it can easily get clogged with filament jam. Keeping the nozzle clean is essential not only for solving this issue, but also for performing routine maintenance on your 3D machine. There are three methods for cleaning the nozzle: using a cleaning tool, making a cold pull, and removing the nozzle for a deep clean. We also have a detailed guide on 3 Methods to Fix Clogged Printer Nozzle.
5. Stabilize the Printing Temperature
Printing temperature refers to both printer temperature and room temperature. If either of these temperatures fluctuates, it can cause inconsistent extrusion and Z banding. To maintain a stable room temperature, using an enclosure for your printer can be an effective solution. Printer temperature, on the other hand, includes the temperature of the nozzle and the hotbed. To avoid printer temperature variation, it is necessary to adjust the printing settings in the slicer and check the thermistor. A thermistor is a common device used for measuring temperatures on 3D printers. And you can find it on the printhead and the hotbed.
6. Print with High-Quality Filament

Using high-quality filament can prevent inconsistencies in extrusion, improve the print quality, as well as prolong the service life of your machine. Since the high-grade filament is produced with strict manufacturing standards in terms of raw materials, production technologies and packing requirements, it is important to select the filament with a quality guarantee, such as Anycubic 1.75mm Filaments. Anycubic provides three different textures of filaments to meet various user needs: Basic PLA, Silk PLA and Matte PLA. These filaments are neatly packaged on spools with a consistent diameter, ensuring a smooth extruding process.
Here’s a video to appreciate the beauty of Anycubic Silk PLA that gives a satin sheen.
In Conclusion
Z banding is a common phenomenon in bad-quality 3D prints, often resulting from Z-axis wobbling and uneven extrusion. To prevent Z wobble and Z banding, keep maintaining the Z-axis hardware. Additionally, cleaning the nozzle and printing with high-quality filament can help you reduce inconsistencies in extrusion. If you are encountering Z banding, the information in this article can assist you in identifying the causes and implementing effective solutions.