Are you looking for ways to improve your resin 3D printing results? Check out these 7 3D printing slicer settings that will deliver outstanding performance. With the right tweaks, you'll be able to produce smoother prints with less layer separation and fewer defects. Read on to learn more!
7 Common Slicer Setting
Following are the seven common slicer settings that you need to check out for smoother prints with fewer defects, using our Anycubic Photon Workshop as a sample slicer.
1.Layer Height
Layer height is one of the key factors that determine the quality of a 3D print. It is also one of the settings that you can adjust to influence print time and material usage. Simply put, layer height is the thickness of each individual layer of your print.

a) Standard Layer Heights
One of the challenges of resin printing is achieving the correct layer height. If the layer height is too thick, the print will be less detailed and may have visible layer lines. On the other hand, if the layer height is too thin, the print may take a long time to complete or may fail entirely.
A layer height of 25 microns provides a good balance between print speed and quality, making it an ideal choice for most applications. Of course, every project is different, and you may need to experiment with different layer heights to find the perfect setting for your needs.
b)Low Layer Heights
In general, lower layer heights will result in better print quality, but they also come with a few challenges. First of all, low layer heights require a printer that is capable of very precise movements. Most printers have a minimum step size for their Z-axis of around 0.004 inches (100 microns), but some newer models can go as low as 0.001 inches (25 microns).
Second, low layer heights also mean that each print will take longer to complete. This is because there are simply more layers that need to be printed. Finally, it is worth noting that not all resins are capable of being printed at very low layer heights.
In general, most resins should be able to achieve a minimum height of 10 microns, but some may have difficulty going any lower than 20 or 30 microns.
2.Bottom Layer Exposure Time
Bottom layer exposure time is an important consideration for anyone printing with a resin 3D printer. The bottom layer is the foundation of the print, and if it is not properly cured, the entire print can be compromised. The recommended exposure time for the bottom layer is 8-12 times the regular exposure time.
In order to ensure that 3D printing layers adhere correctly, the bottom layer requires an extended exposure time. Depending on your typical setting this can range from 12-36 seconds per layer - a considerable departure from usual 1.5-3 second intervals. Failure to follow this recommendation can lead to poor print quality and even print failure.

With such a wide range of recommended exposure times, it is important to experiment to find the perfect setting for your printer and materials. Once you have found the right setting, be sure to document it so that you can replicate your results in the future.
3.Lifting Speed
When it comes to 3D printing, the speed of lifting the tool head can have a large impact on how quickly your prints are finished. If a tool head takes too long to lift, then that extra time can quickly add up over multiple layers, resulting in longer printing times overall.
To ensure faster print times, it's important to consider all of the settings impacting lifting speed and understand their relationship with print time when fine-tuning your printer. Selecting appropriate lifting speeds specific to each printer and material combination can help guarantee successful and efficient prints every time.
4.Lifting Distance
The lifting distance of a printer plays an important role in the final outcome of a 3D print. This distance is set according to the profile settings and generally tends to float around 5mm. To obtain optimal results, it is important for users to adjust this parameter accordingly, as it can have a major effect on the printed part's accuracy, resolution, and detail levels. Careful attention should be given to this setting when creating highly detailed prints, as even minor changes here can result in drastically different outcomes.
5.Print Orientation
Print orientation is a critical decision-making factor when 3D printing an object, as the angle affects the print time and resolution. Printer settings are important to consider; they can drastically decrease the amount of time needed to complete a particular project.
For instance, if the material is printed at a 45° angle rather than a standard 90° orientation, then it could ultimately be more cost and time efficient. It is essential that one considers both their design criteria and machine capabilities when deciding on an optimal print orientation for their projects in order to gain the best results possible.
6.Supports
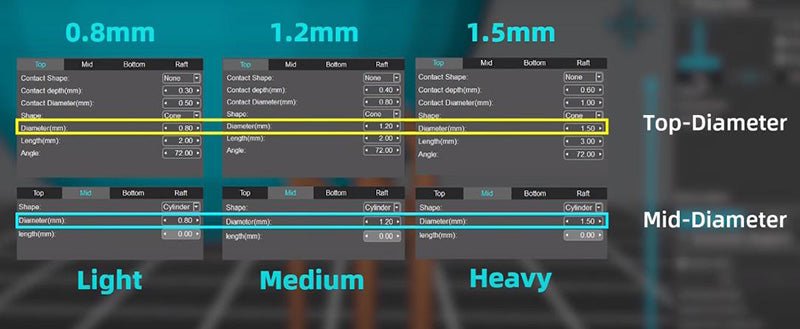
Resin 3D printing requires supports to complete prints successfully. These support structures are typically designed and generated by the printer's slicing software. In contrast to FDM 3D printing, resin supports are much more complex and often require several different orientations to provide maximum support stability.

This complexity provides a challenge for the user, as the slicing software must be properly configured in order to generate sufficient support structures around all of the desired features in print. Additionally, extra attention must be given to individual regions that contain intricate geometries or overhangs, as these regions often require additional support material in order to prevent failure during post-curing and printing operations.
7.Exposure Time
The time in which the resin is exposed to the UV light source is key for a successful 3D print. Depending on the type of resin used, including the thickness of layers, the exposure time may vary. For new users printing with UV resin, it is recommended to start with short exposure times and gradually increase over subsequent prints.

In general, longer exposure times tend to provide improved layer adhesion but may also lead to darker prints as well as burns on thin or shallow sections. To get optimal results for each project, it is crucial to identify and adjust your parameters according to material type, layer height, and part geometry.
Final Thought
While the slicer settings we've outlined are a great starting point, it's important to experiment with different combinations to find what works best for your specific 3D printing needs. With a little trial and error, you should be able to dial in the perfect slicer settings for resin-based 3D printing that produces high-quality prints time and again, also you can read the beginner guide to help you pick the best resin 3d printerfor your creation.


